Sewing Lessons and Lavender Sachets

IMG_6273.jpg

My boys are always asking me about crochet and knitting.  The older two want to learn, and I have tried to teach them, but our few lessons have ended with everyone frustrated.  R (8) does not excel at fine motor skills and tends to hold the hook, or needles, with a death grip.  Big A (7) just doesn’t have the patience to learn yet.  I got them some knitting looms, but they need help wrapping the yarn and tend to drop a lot of stitches.  It’s just not working out for us.

So, we tried sewing.  I started teaching R to sew last fall.  We got some 5″ quilting squares and he made a bunch of beanbags.  He had fun, but we have way too many beanbags.  He wanted to sew again, and Big A wanted to learn, and we do not need anymore beanbags.  Ever.

My brainstorming finally turned up lavender sachets. Continue reading

Four Little Monkeys Bake Apple Crisp

img_3725

When we have bananas which need to be used we make Banana Bread.  When we have apples which need to be used we make apple crisp.

Apple crisp is one of my favorite things to bake with kids.  It is delicious, there aren’t any raw eggs, you don’t need to measure exactly, if at all, and you get to use a really fun apple slicer.

Continue reading

Chalk Paint

xtra (2)

Yesterday son #2 asked me whether he could paint.  We used to do a lot of painting.  But with five kids, including a baby who has apparently given up sleeping at night, not so much recently.  I had just gotten the baby down for a nap and was taking a few precious moments to sit down with some tea and a book.  I desperately wanted to tell him “No.”  Painting involves way too much set up, supervision, and clean up.  There’s never anywhere to put the drying paintings and I never know what to do with them once they are dry.  But, he had been asking a lot.  And I really do try to be a good mom.

And then it hit me.  I could let him paint without most of the problems.  And I could use up some mess at the same time.  It did get me out of my chair, but it was worth it.

We took some of the kids’ broken pieces of chalk.  We have a lot of them because son #4 went through a phase of throwing chalk so he could watch it break.  We took 2-4 small piece of similar colors and ground them up with a rock.  We mixed in a little water and… chalk paint!

This slideshow requires JavaScript.

It worked surprisingly well, especially on such a hot afternoon.  Grandpa even came by and collaborated with son #2 on a pumpkin.

This slideshow requires JavaScript.

I even made a pretty sunset to try blending

sunset (1)sunset (2)

and, of course, a rainbow (no fall stuff for me yet!)

xtra (3)

xtra (1)

This is far too easy to be a novel idea, but I did come upon it by myself.  I love that it helped use up the little ends of chalk.  And that any mess will wash away with the next rain.

Father’s Day

I almost dropped the ball this year and had to throw together a last minute Father’s Day gift.  We never do a lot of Mother’s Day or Father’s Day, but the kids wanted to make something for Daddy.  Thankfully, we have paint and markers and even had a canvas on hand.  Before giving it to Daddy I put the kids’ names next to each hand print with a very fine tip permanent marker.  IMG_9024 edit

(oldest to youngest is pink, blue, orange, red, purple)

Masking Tape Alphabet Canvas

IMG_7646 (2)

The kids have been doing some making tape paintings.  You know, where you put masking tape on the canvas, paint over it, let it dry, and then peel off the tape.  The method is fun, but the results have been, well, lackluster.IMG_7647
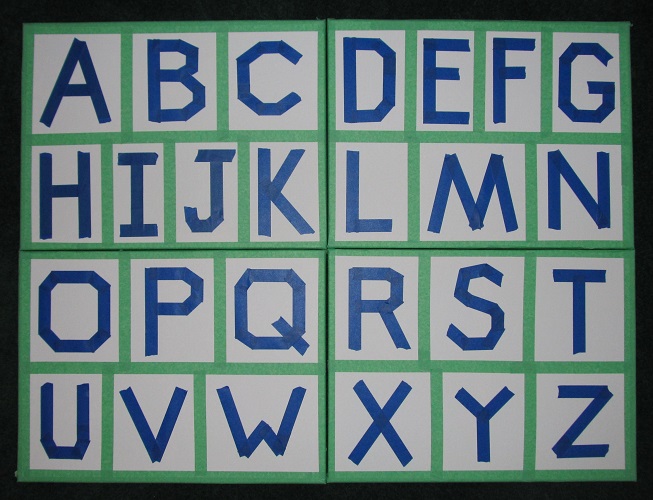
Then I found some large (18″ x 24″) canvases on sale for $3 each.  I decided, on the spot, that I would make a giant masking tape alphabet for Miss C’s room.

Materials:

  1. canvases
  2. Masking tape or painters tape.  I ran out of my partial green roll, so I had to get more.
  3. paint
  4. brushes
  5. something to keep paint off the cheap playroom carpet

Steps:

  1. Put masking tape on the canvas in the shapes you want
  2. press down firmly all over the tape
  3. paint
  4. let dry
  5. peel off the tape

Here is my alphabet all taped.  I used 1″ tape.  The whole thing is 4 feet wide by 3 feet tall.

IMG_7622

A close up of some letters.  I didn’t try to make them perfect.  I like the rough edges.

IMG_7624

all painted and drying.

Miss C’s room is a light, cool purple.  I chose pink, yellow, teal, blue, and purple for the letters.  For each color I swirled two paints so there would be a little color variation.  The purple is dark purple and white.  The pink is light and dark pink.  The blue is light and dark blue.  The yellow is yellow and orange.  The teal is teal and very light yellow.

IMG_7634

All finished (well, almost)

IMG_7646

Like I said, it’s 3 feet by 4 feet.  It’s huge.  I love how the colors turned out and I think it will look really nice in her room.  I’m going to get some mending plates and screw the wooden frames of the canvases together to make it effectively one enormous canvas.  I’ll take another picture once I eventually get it on the wall.


Crayon Paintings

IMG_7020

Here’s another kids’ craft.  I saw one of these hanging in our pediatrician’s office and spent my waiting time figuring out how it was done.  Then I got home and realized the directions are all over the internet.  At least it was a fun thought exercise.  My kids needed help to do this.  My older two could probably do it themselves, but they were a little scared of the hairdryer, having never really seen one used before.  I’m not even sure why we have a hairdryer, given that I never use it on my hair and am pretty sure I wasn’t the one to buy it.

Materials:

  1. canvas
  2. crayons
  3. hot glue gun
  4. hair dryer

steps:

  1. use hot glue gun to glue crayons to canvas
  2. use hair dryer to melt crayons (careful, ours splattered a bit)
  3. admire your artwork

IMG_7028 (2) small

Note: don’t accidentally drop the picture on the floor when putting it on the mantelpiece.  The crayons fall off, the kids cry, and you spend 20 minutes matching the crayons back up and gluing them back on.

Little Kids’ Wind Chimes

I haven’t fallen off the face of the Earth.  Instead, my kids caught the crafting bug.  It happens sometimes.  We have been working on a few projects, but I wanted to start with something even Little A, 2-years-old, was able to do.

Here are some of the finished “wind chimes” (indoor only, sadly)

both.jpg

and here are the materials

IMG_6930 (2) small

  1. a wooden shape
  2. acrylic paint (we practiced mixing colors)
  3. cheap yarn
  4. clear pony beads
  5. some animal beads I found which make a nice jingly sound.  I’m sure I didn’t look at all strange walking down the bead aisle shaking bags of beads and listening to them.
  6. a hot glue gun (not pictured)

First the kids painted the shapes: stars, lady bugs, sail boats, and cats.  While they dried the kids got to work on fine motor skills with the beading.  Little A loved it.  Then I worked the hot glue gun and glued the strings of beads, and some yarn for hanging, to the back of the shapes.   They’re cute, and the kids had fun.

No, I don’t homeschool, by the way.  I enjoy the time when they are out of the house.  And I enjoy when they come back home again.